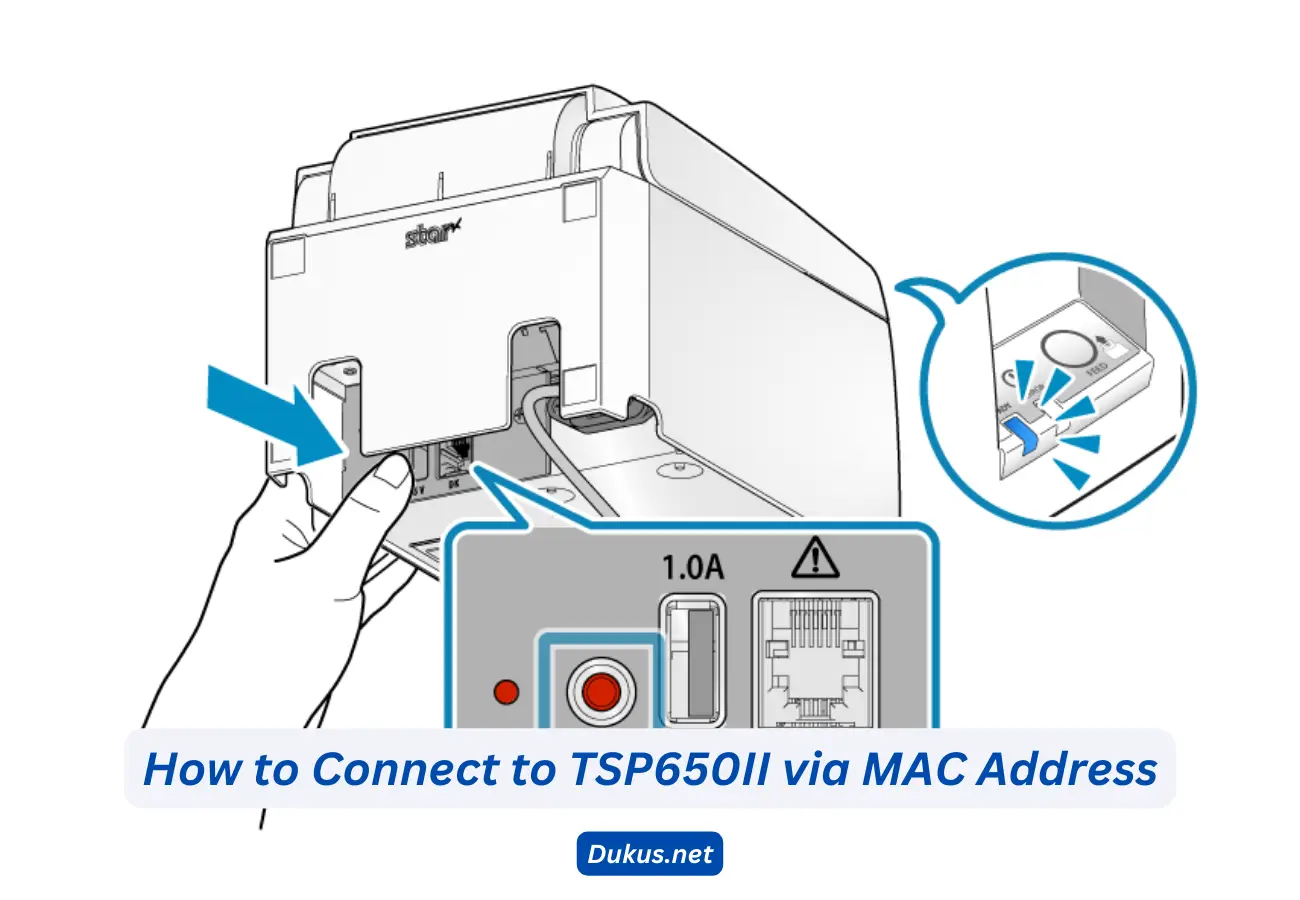
How to Connect to TSP650II via MAC Address starts with identifying the printer’s MAC address, which is a unique identifier used for network communication. To find the MAC address, print a self-test page by holding down the feed button while powering on the printer. Once you have the MAC address, you can use it to connect the printer to a network.
In most cases, this involves accessing your router’s settings and inputting the MAC address to allow the printer to connect securely. This method is particularly useful in environments where you want to restrict access to specific devices, ensuring that only approved hardware can interact with the networked printer. By following these steps, you can establish a reliable and secure connection to your Star TSP650II.
Connecting your Star TSP650II printer via its MAC address ensures a secure and stable connection, whether you are using Bluetooth or Wi-Fi. This article will walk you through the steps of setting up your TSP650II, Bluetooth pairing, configuring Wi-Fi, and troubleshooting common issues. We’ll also explore how to locate the printer’s MAC address and explain what a MAC address is and its importance in network setups.
Star TSP650II Setup
Setting up the Star TSP650II is straightforward and can be completed in a few steps. First, unbox the printer and connect it to a power source. Make sure that you have the necessary accessories, such as the power cable and interface cable. Once everything is plugged in, turn on the printer by pressing the power button.
Next, install the driver for the TSP650II on your device. Star Micronics provides a downloadable driver from their official website, compatible with various operating systems, including Windows and macOS. After downloading the driver, follow the on-screen instructions to install it. This driver is essential for establishing communication between your device and the printer.
Finally, test your setup by printing a sample receipt. Make sure the printer is correctly connected to your computer or mobile device. If there are any issues during this setup, you may need to refer to the printer’s manual or reset the device to factory settings before trying again.
Star TSP650II Bluetooth Pairing
Bluetooth pairing allows you to connect the Star TSP650II to mobile devices or computers without using a cable. To start the pairing process, ensure the printer is powered on and in pairing mode. Usually, you can enable pairing by pressing a combination of buttons, as indicated in the printer’s manual. The pairing light will flash, signaling that the device is ready to connect.
On your mobile device or computer, go to the Bluetooth settings and search for new devices. The Star TSP650II should appear in the list. Select it to initiate pairing, and if prompted, enter the default PIN code (commonly “1234” or “0000”). Once paired, you should see a confirmation on both your printer and the device.
If the printer is not pairing, double-check that Bluetooth is enabled on both devices and that they are within range. Refer to the “Star Micronics TSP650II not pairing” section if problems persist, as troubleshooting steps are provided there.
Star TSP650II Wi-Fi Setup
For those wanting to connect the TSP650II printer via Wi-Fi, the setup process involves accessing the printer’s network settings. Start by making sure the printer is in Wi-Fi mode. You can usually toggle between modes using the printer’s control panel. Once Wi-Fi is enabled, use a computer or mobile device to connect to the printer’s temporary Wi-Fi network.
After connecting to this network, open a web browser and type in the printer’s IP address to access the configuration page. Here, you can input your primary Wi-Fi network credentials, such as the SSID and password, to connect the printer to your home or office network. Once this is done, your printer will be accessible to other devices on the same Wi-Fi network.
If you are experiencing issues with the Wi-Fi setup, resetting the printer or reconfiguring your router may solve the problem. Ensure that your network is stable and that the printer’s firmware is up to date.
Star TSP650II Manual
The Star TSP650II manual is an essential resource for users, offering detailed guidance on setup, maintenance, and troubleshooting. You can find the manual either in the printer’s packaging or download it from the Star Micronics website. This manual covers everything from basic setup instructions to advanced configurations, such as connecting via Bluetooth or Wi-Fi.
When you encounter issues, referring to the manual is often the quickest way to find a solution. The troubleshooting section provides helpful tips on resolving common problems like pairing failures, printing errors, and driver installation issues. For more advanced users, the manual also includes instructions for configuring the printer in various environments, such as retail or hospitality.
It’s a good idea to keep the manual handy or bookmark the online version for easy access. This will save you time if you need to look up specific settings or troubleshoot a problem.
Star Micronics TSP650II Not Pairing
If your Star Micronics TSP650II printer is not pairing, it could be due to several factors. First, ensure that the printer is in pairing mode. You can verify this by checking if the Bluetooth light is blinking. If not, press the necessary button combination (as outlined in the manual) to enable pairing mode.
If the device still won’t pair, restart both the printer and the device you are trying to connect. Sometimes, the Bluetooth settings on mobile devices or computers can cause connectivity issues, so try resetting these settings. Also, ensure that no other devices are connected to the printer, as this may prevent additional connections.
If problems persist, it might be helpful to perform a factory reset on the printer. This will restore the printer’s default settings and can often resolve pairing issues caused by incorrect configurations or previous connections.
TSP650II Driver
The TSP650II driver is crucial for ensuring the printer communicates properly with your computer or mobile device. You can download the latest driver from the Star Micronics website. Make sure to select the correct version based on your operating system—Windows, macOS, or Linux.
Installing the driver is typically straightforward. Download the driver package and follow the installation prompts. Once installed, the printer should appear as an available device in your print settings. If you encounter issues during installation, it may be necessary to uninstall any previous drivers and try again.
Regularly updating the driver ensures that your printer remains compatible with your device’s operating system updates, avoiding connectivity and performance issues.
Star TSP650II Factory Reset
Performing a factory reset on your Star TSP650II can resolve many issues, such as connectivity problems or incorrect settings. To reset the printer, turn it off and hold down the feed button while turning it back on. Keep holding the button until the printer performs a self-test and prints out the configuration settings.
After resetting, the printer will return to its default factory settings, including network configurations and pairing settings. You’ll need to set up your printer again, including pairing it with devices or reconnecting it to a Wi-Fi network.
A factory reset should be used as a last resort, as it will erase all previous settings. However, it is often the best solution when other troubleshooting methods fail.
FAQ’s
How Do I Pair My Star TSP650II?
Pairing your Star TSP650II with a device, whether it’s a computer, tablet, or mobile phone, is relatively simple. First, ensure that the printer is in pairing mode by pressing the required buttons to activate Bluetooth pairing. Once in pairing mode, the Bluetooth light will blink, indicating the printer is discoverable.
Next, open the Bluetooth settings on your device and search for new devices. When you see “Star TSP650II” listed, select it, and confirm the pairing request. Enter the default PIN code if prompted. Once paired, the printer will remain connected until you manually disconnect it or the devices are out of range.
Refer to the “Star Micronics TSP650II not pairing” section if you experience issues during this process.
How Do You Pair a Star Micronics Printer?
Pairing a Star Micronics printer like the TSP650II follows similar steps across models. Start by enabling Bluetooth pairing mode on the printer. The method for activating pairing mode may vary slightly, so it’s essential to refer to the printer’s manual for exact instructions.
Once in pairing mode, go to your device’s Bluetooth settings and search for available devices. Select the Star Micronics printer from the list, and enter the pairing PIN code if prompted. After successful pairing, your device should automatically detect the printer in future sessions unless the connection is reset.
If you face difficulties during the pairing process, ensure both devices are compatible and within the proper range. Restarting both the printer and your device can also help resolve connectivity issues.
How to Get Star Printer MAC Address?
The MAC address of your Star TSP650II printer is a unique identifier used in networking. You can find this address by printing out a self-test page from the printer. To do this, hold down the feed button while turning on the printer. The self-test page will print, and the MAC address will be listed among the network settings.
This MAC address is crucial when configuring network settings, especially for Wi-Fi connections or when setting up a secure connection with a specific device. It can also be used to filter connections to your printer on a network, ensuring that only approved devices can pair with it.
Make sure to record the MAC address, as you may need it during the Wi-Fi setup process or when troubleshooting connectivity issues.
What Is a MAC Address on a Printer?
A MAC (Media Access Control) address is a unique identifier assigned to the network interface of a device like a printer. This address allows the printer to communicate with other devices on the network and ensures each device is uniquely identifiable. The MAC address is a combination of numbers and letters and is essential for establishing network connections.
In a printer, the MAC address is particularly important when setting up Wi-Fi or Bluetooth connections. It allows you to configure network security settings, ensuring that only approved devices can access the printer. If you need to set up a static IP or configure network permissions, the MAC address will be required.
Understanding the MAC address and its role in networking can help you manage your printer more effectively and troubleshoot any issues related to connectivity.